Hallå!
Har någon omfattande erfarenhet av gambesonsömnad? Har någon något tips vad gäller min fruktade klumpiga ansamling av tyg och stoppning under armarna och kanske vid armvecken?
Har jag rätt för mig när jag antar att en jack används som vilken annan rustning som helst, och således bör/kan användas med stoppning?
Jag gjorde nämligen ett litet experiment hemma genom att lägga 30 lager linnetyg på varandra och sedan prova genom att banka mig själv i bröstet med knytnäven. Det gjorde lite lagom ont, så därför borde det göra kalas-ont att få ett svärd på sig under samma förutsättningar. För att få fram ett plagg av den här konstruktionen som både tar upp stötar och skyddar mot skär- eller stickskador skulle nog kräva 60 lager, och det är förbaskat dyrt och borde bli orimligt tungt.
Förslag?
/Peter
Gambeson
 av Eva Andersson » 22 april 2003, 12:50
Nu är jag långt ifrån någon expert, men efter vad jag har förstått så stoppade man kanaler eller rutor (det går ju fint för hand eftersom man stoppar i fyllningen efter som och syr ihop rutan innan man börjar med nästa) med ull, bomull, tygrester etc.
Jag har hört att tagel, som är vanligt bland annat i SCA (och som jag har stoppat en gambeson med), inte användes till stoppningen under medeltiden, men vet inte var den uppgiften kommeri från.
En kul grej är att om man tittar på bilder från Maciejowskibibeln, t ex här: http://www.medievaltymes.com/courtyard/ ... 10ra&b.gif
så verkar figuren i rött ha först ett vadderat plagg under och sedan en ärmlös "surkot" som också är vadderad. Det skulle ge både en högre rörlighet för armarna och mer skydd över själva kroppen. De var smarta på medeltiden [:)]
Eva
Jag har hört att tagel, som är vanligt bland annat i SCA (och som jag har stoppat en gambeson med), inte användes till stoppningen under medeltiden, men vet inte var den uppgiften kommeri från.
En kul grej är att om man tittar på bilder från Maciejowskibibeln, t ex här: http://www.medievaltymes.com/courtyard/ ... 10ra&b.gif
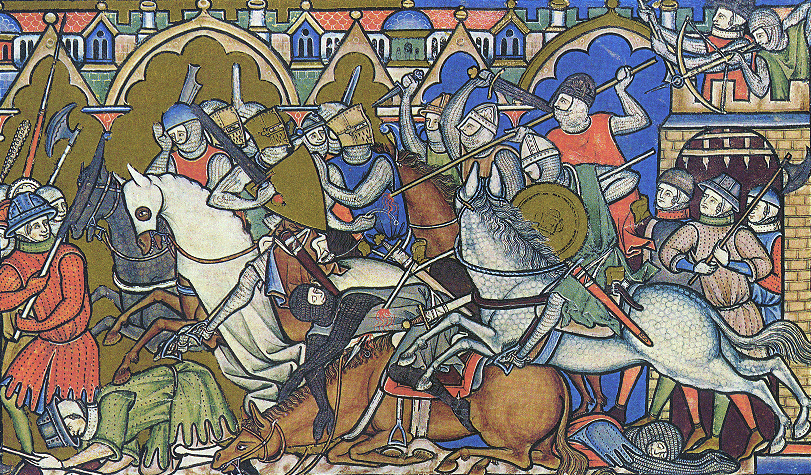
så verkar figuren i rött ha först ett vadderat plagg under och sedan en ärmlös "surkot" som också är vadderad. Det skulle ge både en högre rörlighet för armarna och mer skydd över själva kroppen. De var smarta på medeltiden [:)]
Eva
- Eva Andersson
- Inlägg: 1251
- Blev medlem: 17 december 2002, 23:48
- Ort: Sweden
av Joakim K » 22 april 2003, 13:16
Apropos det där med "jack" och 30 eller 60 lager...
Såg ett inlägg en gång i ett annat forum om att några (från royal armouries?) hade gjort ett test med 30 lager och ringbrynja under...
Det stoppade pilar alldeles utmärkt... Och så här på rak arm så vet
jag ju inte vilket avstånd de sköt på eller andra omständigheter....
Olofsgillet har annars hållt på en del med sådant... Fråga dem.
Själv tänkte jag slänga ihop en jack till träningen....
~10 lager plus lite vaddering utanför. Lite smärta får man tåla
Ett tips om man vill göra en gambesson istället är att inte stoppa
allt i kanaler utan att lägga vaderingen mellan tyglagren och sedan
sy det där kanalliknande... Då blir det jämntjockt överallt och fungerar bättre... Framförallt ser man inte ut som michelingubben
Nu får nån som kan mer rätta mig på den punkten ...
Såg ett inlägg en gång i ett annat forum om att några (från royal armouries?) hade gjort ett test med 30 lager och ringbrynja under...
Det stoppade pilar alldeles utmärkt... Och så här på rak arm så vet
jag ju inte vilket avstånd de sköt på eller andra omständigheter....
Olofsgillet har annars hållt på en del med sådant... Fråga dem.
Själv tänkte jag slänga ihop en jack till träningen....
~10 lager plus lite vaddering utanför. Lite smärta får man tåla
Ett tips om man vill göra en gambesson istället är att inte stoppa
allt i kanaler utan att lägga vaderingen mellan tyglagren och sedan
sy det där kanalliknande... Då blir det jämntjockt överallt och fungerar bättre... Framförallt ser man inte ut som michelingubben
Nu får nån som kan mer rätta mig på den punkten ...
- Joakim K
- Inlägg: 562
- Blev medlem: 18 november 2002, 09:32
- Ort:
av John-Kompani Bastard » 23 april 2003, 01:14
Hej
Jag har själv sytt några vadderade plagg (ordval å dessa plagg är en komplicerad fråga, såsom flera av deltagarna på forumet kan vittna om), men hinner inte kommentera ämnet ingående. Kan bara nämna att det i de få fall av bevarade vadderade plagg som finns bevarade från västeuropa och som jag känner till finns det ingen som "verkar" ha haft stoppade kanaler. De är sydda såsom Joakim antyder. Stygnen går genom alla lager. Smidigaste, lättaste och segaste (vilket man märker mer än väl när man syr) är att vaddera med råbomull (belagt i flera bevarade plagg). Finna att köpa på tapetserarbutiker-sådana som stoppar möbler etc).
I veckrika delar av plagget minskar man ner vadderingstjockleken för smidigare rörelse.
Plagg med 4,5 cm breda kanaler och två lager råbomull á 1,5-2 cm initialtjocklek krymper ca 15%-20% tvärs kanalernas riktning och 5% i kanalernas riktning.
Lycka till!
John-KB
Jag har själv sytt några vadderade plagg (ordval å dessa plagg är en komplicerad fråga, såsom flera av deltagarna på forumet kan vittna om), men hinner inte kommentera ämnet ingående. Kan bara nämna att det i de få fall av bevarade vadderade plagg som finns bevarade från västeuropa och som jag känner till finns det ingen som "verkar" ha haft stoppade kanaler. De är sydda såsom Joakim antyder. Stygnen går genom alla lager. Smidigaste, lättaste och segaste (vilket man märker mer än väl när man syr) är att vaddera med råbomull (belagt i flera bevarade plagg). Finna att köpa på tapetserarbutiker-sådana som stoppar möbler etc).
I veckrika delar av plagget minskar man ner vadderingstjockleken för smidigare rörelse.
Plagg med 4,5 cm breda kanaler och två lager råbomull á 1,5-2 cm initialtjocklek krymper ca 15%-20% tvärs kanalernas riktning och 5% i kanalernas riktning.
Lycka till!
John-KB
- John-Kompani Bastard
- Inlägg: 53
- Blev medlem: 17 september 2002, 08:35
- Ort:
av Admin » 23 april 2003, 08:33
Hej!
Har också hållt på en hel del med att försöka få förståelse för hur tygrustningarna konstruerats under medeltiden; framför allt senmedeltiden. Jag känner mig rätt så säker på att man inte har sytt kanaler som stoppats i efterhand, utan i stort sett alltid kviltat materialet (så att man håller ihop alla mellanlagringar, annars glider de runt och bylsar sig). Tygrustningar finns också i många olika varianter, allt från sådant som bäres under plåtrustning (vapentröjor) till sådant som bäres över ("jacks", förmodligen "pansar" på svenska). Under tidigare medeltid refereras till aketons (av bomull) och gambesons (oklar betydelse, men de senare kan uppenbarligen bäras både över och under en rustning. Jag har för ganska länge sen startat en dokumentation av min egen "jack", den är inte klar men jag klipper in det här nedan. Det är skrivet på engelska och inte korrekturläst, kan sägas som en brasklapp.
/Henrik
*******************
A 15th century aketon:
Introduction
This is the documentation from my attempt to construct a late medieval textile armour, a garment wich has many names among which we can find aketon, arming coat, gambeson, jack, hacketon etc. For convenience, and because of the construction, I will in this article refer to the item as an aketon.
Background
My intention to make a late medieval arming coat has a quiet long history, beginning in 1999 with the fact that I was less interested in buing a metal armour than the other guys in my company, but I still wanted to join the group in explicitly military events. I didn´t have a clue that the amount of work standing before me was a lot more expensive, from the view-point of time spent, than it would have been just cashing up for a harness and a bevor in iron. I started out with collecting all references I were able to find on the subject from the internet, from books and articles in magazines. I only found a few, and when I started to read I realised that the quality of most of it was pretty low. My impression was that the researchers far from agreed in fundamentals such as weight, construction, name, protection and materials. Only a few even mentioned the problem that these garments probably didn´t have a similar function chronologically, or that there must have existed several types of textile armours, with different names, during the same period. I also noted that the latest books had the most nuanced view of the problem. Because of the lack of any surviving multi-layered garments (so called jacks) I decided to make an aketon constructed from sturdy linen and stuffed with cotton. In the Zeitschrift Waffen und Kostymkunde I found an article about quilted armours, where three surviving 15th century quilted jackets were throughly analysed and documented. I tried to copy the construction details as far as possible from what I could find out of the documentation, and what was possible with modern materials and tools available. The surviving examples though, are all sleveless and without collar, so I changed the pattern to more fit the idea of the jacket I wanted to make. Articles in Company of st Georges magazine Dragon were also of very much use when it came to the practical part of the process.
Construction
The german jackets documented in Waffen und Kostümkunde are all made from the same principles. From the inside they are constructed out of 1) a lining layer of XXX, 2) a layer of canvas, 3) a layer of heavily compressed cotton, 4) another layer of canvas, and 5) a final layer of linen on the outside. The author mentions that he had problems pressing a needle through all layers (can´t really get over that he tried!), an observation that I can confirm from my own experience with sewing my jacket. It was needed with some research for the materials as well. I managed to obtain a thick and close canvas for the inbetween-lining, and on the inside and outside of this I used normal linen. The cotton seemed to be the problem, I finally got hold of a material called ”cottonfelt”, used for antique furniture in an upholsterer wholesaler (place for large quantities sale for specialists in renovating old furniture). For the work I also needed needles and thread, which I could find at the wholesale as well. I bought a small but rather thick needle with cutting edges for my purpose. The most conspicous item in the store was a 12 cm long monster needle with three cutting edges, I had to buy that one too (which I later was lucky for). The materials were all relatively unexpensive, all in all I payed about 50 – 70 Euro.
Pattern:
I started out with the construction of the pattern. The tight fit of a garment that is to be quilted is rather crucial, the measures will be different on different parts because of different thickness of the padding. Thus, there is a considerable difference between the outer and the inner layer, and finally the quilting must be a compormise to make a well fit to the body. More about that later.
I had an old pattern made for my doublet, so I made use of it again with an extension to cover the hips. This pattern was of course the innermost part of my jack – the outer parts had to be extended in all directions to allow for the padding inbetween. The shoulder seam had to be moved up in direction towards the neck, and the arm hole needed to be extended. I did these changes because of recommendations from others who had made arming coats. Now I can confirm this – it would have been very hard to move my arm without that extra space. One mustn´t forget that the padding when once quilted is quiet relentless in its obstruction to our possibility to move.
My experience with quilting was near to nonexistant, so I didn´t have a clue of how much it would affect the shrinkage of the outer and inner layers. Therefore I just extended the pattern equally with five percent in all directions, which resulted in about 2 cm prolongation for all margins. This was too much, which I later realised, and during the quilting I managed to cut away most of the waste. The outer side consisted of two layers, as the inner layer, and these were pinned together to keep in place.
Sewing:
When all parts were cut I completed the back-piece by sewing together the two rear parts and then attached the collar. The front was then attached to the back but only over the shoulder seam. The inner layers were attached to the outer by the top seam of the collar but I left the front open until after the inpassing of the cotton. At this point the garment could be spread out in three directions on the floor, with the collar in its centre and the front pieces pointing away from each other. It is clever to wait with the side seams until last, there you have the possibility to correct most of your mistakes to make the jacket fit anyway. Now it was time for the quilting.
Quilting:
This is a part of the process where a short note has to be made about quilting. A common misconception is that the arming coats were first quilted, and then padded. This idea probably has its origin in the false assumption that arming coats were needed only to soften and spread the impact of a blow. Lots of evidence point out that arming coats had a double functionality, one of them to reduce the impact of a blow, but the other to stop sharp weapons like arrows and spears from doing severe damage to the body. This wouldn´t be possible if the seam was made before the padding – then the seam would be far weaker than the padded part. In a quilted garment the seams are the strongest parts. As we can see later this is also confirmed by the tests of the aketon I made.
I started with the neck. This may in retrospective seem a little stupid, since the neck part is the most conspiscious of the visible parts, but the other places of the jack are both thicker and more varied so I think that you wouldn´t find a better place to start. Just keep the hand steady and make the stitches even. I padded my jack about 1 cm thick (about 0,5 cm in the stiching rows). With 2-3 cm of space between the rows that makes a rather stiff neck, softening first after a bit of usage. To get the padding this thick I needed what looked like ten times as much cotton, when pressed together the cotton hardly takes any place. In the collar I used about 20 cm of raw cotton to get 1 cm in the end.
During the quilting you have to be aware of the final shape of the jacket. I bent the collar with my fingers to make it follow the neck, but this is a hard part – there is a considerable risk that you will not get the same symmetrical shape at both sides if you don´t stay clear in mind. The collar must also be attached to its corresponding part at the inside, through the padding, to get a nice shape. After this you try it on, to make sure it will be possible to quilt the rest as well. At this time it is possible to make some adjustments if the quilting have put the upper and inner layers on drift from each other, which frequently occured to me. I have to mention something about the needles too. I started with the smaller needle, bought in the upholsterer store, but rather soon I saw that it would be perfectly impossible to accomplish the work with that one. To start with, I had no possible way to even see the needle through all the padding (it was too short) so I had to press the cotton between thumb and fingers which was rather tireing. Then I cut myself when trying to pull the sharp needle through the cotton, which was a lot harder than I imagined from the start. I had to switch into using the larger needle, and a special tool which looks like a thimble turned and placed in a leather case to be held in the palm (originally for sewing sails, it gives more strength when pushing the needle through the fabric). With this ”glove” and needle I managed to quilt the neck. The thread I used was of linen and made for leather work, but it broke repeatedly. After a while I had found a level of pressure and pull where it didn´t break, but I recommend you all to use as thick a thread as possible. It is worth a note that the thread will increase its ability to break for every stitch. This is because of the cutting edges that passes the thread from the former stitch all the time.
Har också hållt på en hel del med att försöka få förståelse för hur tygrustningarna konstruerats under medeltiden; framför allt senmedeltiden. Jag känner mig rätt så säker på att man inte har sytt kanaler som stoppats i efterhand, utan i stort sett alltid kviltat materialet (så att man håller ihop alla mellanlagringar, annars glider de runt och bylsar sig). Tygrustningar finns också i många olika varianter, allt från sådant som bäres under plåtrustning (vapentröjor) till sådant som bäres över ("jacks", förmodligen "pansar" på svenska). Under tidigare medeltid refereras till aketons (av bomull) och gambesons (oklar betydelse, men de senare kan uppenbarligen bäras både över och under en rustning. Jag har för ganska länge sen startat en dokumentation av min egen "jack", den är inte klar men jag klipper in det här nedan. Det är skrivet på engelska och inte korrekturläst, kan sägas som en brasklapp.
/Henrik
*******************
A 15th century aketon:
Introduction
This is the documentation from my attempt to construct a late medieval textile armour, a garment wich has many names among which we can find aketon, arming coat, gambeson, jack, hacketon etc. For convenience, and because of the construction, I will in this article refer to the item as an aketon.
Background
My intention to make a late medieval arming coat has a quiet long history, beginning in 1999 with the fact that I was less interested in buing a metal armour than the other guys in my company, but I still wanted to join the group in explicitly military events. I didn´t have a clue that the amount of work standing before me was a lot more expensive, from the view-point of time spent, than it would have been just cashing up for a harness and a bevor in iron. I started out with collecting all references I were able to find on the subject from the internet, from books and articles in magazines. I only found a few, and when I started to read I realised that the quality of most of it was pretty low. My impression was that the researchers far from agreed in fundamentals such as weight, construction, name, protection and materials. Only a few even mentioned the problem that these garments probably didn´t have a similar function chronologically, or that there must have existed several types of textile armours, with different names, during the same period. I also noted that the latest books had the most nuanced view of the problem. Because of the lack of any surviving multi-layered garments (so called jacks) I decided to make an aketon constructed from sturdy linen and stuffed with cotton. In the Zeitschrift Waffen und Kostymkunde I found an article about quilted armours, where three surviving 15th century quilted jackets were throughly analysed and documented. I tried to copy the construction details as far as possible from what I could find out of the documentation, and what was possible with modern materials and tools available. The surviving examples though, are all sleveless and without collar, so I changed the pattern to more fit the idea of the jacket I wanted to make. Articles in Company of st Georges magazine Dragon were also of very much use when it came to the practical part of the process.
Construction
The german jackets documented in Waffen und Kostümkunde are all made from the same principles. From the inside they are constructed out of 1) a lining layer of XXX, 2) a layer of canvas, 3) a layer of heavily compressed cotton, 4) another layer of canvas, and 5) a final layer of linen on the outside. The author mentions that he had problems pressing a needle through all layers (can´t really get over that he tried!), an observation that I can confirm from my own experience with sewing my jacket. It was needed with some research for the materials as well. I managed to obtain a thick and close canvas for the inbetween-lining, and on the inside and outside of this I used normal linen. The cotton seemed to be the problem, I finally got hold of a material called ”cottonfelt”, used for antique furniture in an upholsterer wholesaler (place for large quantities sale for specialists in renovating old furniture). For the work I also needed needles and thread, which I could find at the wholesale as well. I bought a small but rather thick needle with cutting edges for my purpose. The most conspicous item in the store was a 12 cm long monster needle with three cutting edges, I had to buy that one too (which I later was lucky for). The materials were all relatively unexpensive, all in all I payed about 50 – 70 Euro.
Pattern:
I started out with the construction of the pattern. The tight fit of a garment that is to be quilted is rather crucial, the measures will be different on different parts because of different thickness of the padding. Thus, there is a considerable difference between the outer and the inner layer, and finally the quilting must be a compormise to make a well fit to the body. More about that later.
I had an old pattern made for my doublet, so I made use of it again with an extension to cover the hips. This pattern was of course the innermost part of my jack – the outer parts had to be extended in all directions to allow for the padding inbetween. The shoulder seam had to be moved up in direction towards the neck, and the arm hole needed to be extended. I did these changes because of recommendations from others who had made arming coats. Now I can confirm this – it would have been very hard to move my arm without that extra space. One mustn´t forget that the padding when once quilted is quiet relentless in its obstruction to our possibility to move.
My experience with quilting was near to nonexistant, so I didn´t have a clue of how much it would affect the shrinkage of the outer and inner layers. Therefore I just extended the pattern equally with five percent in all directions, which resulted in about 2 cm prolongation for all margins. This was too much, which I later realised, and during the quilting I managed to cut away most of the waste. The outer side consisted of two layers, as the inner layer, and these were pinned together to keep in place.
Sewing:
When all parts were cut I completed the back-piece by sewing together the two rear parts and then attached the collar. The front was then attached to the back but only over the shoulder seam. The inner layers were attached to the outer by the top seam of the collar but I left the front open until after the inpassing of the cotton. At this point the garment could be spread out in three directions on the floor, with the collar in its centre and the front pieces pointing away from each other. It is clever to wait with the side seams until last, there you have the possibility to correct most of your mistakes to make the jacket fit anyway. Now it was time for the quilting.
Quilting:
This is a part of the process where a short note has to be made about quilting. A common misconception is that the arming coats were first quilted, and then padded. This idea probably has its origin in the false assumption that arming coats were needed only to soften and spread the impact of a blow. Lots of evidence point out that arming coats had a double functionality, one of them to reduce the impact of a blow, but the other to stop sharp weapons like arrows and spears from doing severe damage to the body. This wouldn´t be possible if the seam was made before the padding – then the seam would be far weaker than the padded part. In a quilted garment the seams are the strongest parts. As we can see later this is also confirmed by the tests of the aketon I made.
I started with the neck. This may in retrospective seem a little stupid, since the neck part is the most conspiscious of the visible parts, but the other places of the jack are both thicker and more varied so I think that you wouldn´t find a better place to start. Just keep the hand steady and make the stitches even. I padded my jack about 1 cm thick (about 0,5 cm in the stiching rows). With 2-3 cm of space between the rows that makes a rather stiff neck, softening first after a bit of usage. To get the padding this thick I needed what looked like ten times as much cotton, when pressed together the cotton hardly takes any place. In the collar I used about 20 cm of raw cotton to get 1 cm in the end.
During the quilting you have to be aware of the final shape of the jacket. I bent the collar with my fingers to make it follow the neck, but this is a hard part – there is a considerable risk that you will not get the same symmetrical shape at both sides if you don´t stay clear in mind. The collar must also be attached to its corresponding part at the inside, through the padding, to get a nice shape. After this you try it on, to make sure it will be possible to quilt the rest as well. At this time it is possible to make some adjustments if the quilting have put the upper and inner layers on drift from each other, which frequently occured to me. I have to mention something about the needles too. I started with the smaller needle, bought in the upholsterer store, but rather soon I saw that it would be perfectly impossible to accomplish the work with that one. To start with, I had no possible way to even see the needle through all the padding (it was too short) so I had to press the cotton between thumb and fingers which was rather tireing. Then I cut myself when trying to pull the sharp needle through the cotton, which was a lot harder than I imagined from the start. I had to switch into using the larger needle, and a special tool which looks like a thimble turned and placed in a leather case to be held in the palm (originally for sewing sails, it gives more strength when pushing the needle through the fabric). With this ”glove” and needle I managed to quilt the neck. The thread I used was of linen and made for leather work, but it broke repeatedly. After a while I had found a level of pressure and pull where it didn´t break, but I recommend you all to use as thick a thread as possible. It is worth a note that the thread will increase its ability to break for every stitch. This is because of the cutting edges that passes the thread from the former stitch all the time.
- Admin
- Inlägg: 1272
- Blev medlem: 25 juli 2001, 00:00
- Ort: Sweden
av my_mmy » 23 april 2003, 09:11
<blockquote id="quote"><font size="1" face="Verdana, Arial, Helvetica" id="quote">quote:<hr height="1" noshade id="quote"><i>Originally posted by Admin</i>
Jag känner mig rätt så säker på att man inte har sytt kanaler som stoppats i efterhand, utan i stort sett alltid kviltat materialet (så att man håller ihop alla mellanlagringar, annars glider de runt och bylsar sig).<hr height="1" noshade id="quote"></blockquote id="quote"></font id="quote">
mmm. Jag har haft gladjen [}:)]att sy flera "pourpoints" eller vad vi nu ska kalla dem, type Charles de Blois ditto. Nu var i och for sig just det plagget varken vadderat eller kviltat (enligt mina kallor), men det finns gott om bildkallor med liknande plagg som uppenbarligen ar vadderade/kviltade. Jag har funnit att det ar fruktansvart jobbigt att forsoka sy i isattningarna i armarna och aven att jobba med inprovningar runt midjan och ryggen om tyget ar kviltat. Den basta metoden jag funnit ar att prova och sy fodret, sedan bygga upp vadderingen utan somsmaner, och sedan sy pa utsidan varefter plagget kviltas ned fardigt. Nar man tittar pa bilder av detta plagg fran tiden ifraga gar vanligen kvilt linjerna concentriskt runt armen och kroppen, vilket for mig innebar att de ocksa sytts dit efter att plagget byggts upp.
/maggie
Jag känner mig rätt så säker på att man inte har sytt kanaler som stoppats i efterhand, utan i stort sett alltid kviltat materialet (så att man håller ihop alla mellanlagringar, annars glider de runt och bylsar sig).<hr height="1" noshade id="quote"></blockquote id="quote"></font id="quote">
mmm. Jag har haft gladjen [}:)]att sy flera "pourpoints" eller vad vi nu ska kalla dem, type Charles de Blois ditto. Nu var i och for sig just det plagget varken vadderat eller kviltat (enligt mina kallor), men det finns gott om bildkallor med liknande plagg som uppenbarligen ar vadderade/kviltade. Jag har funnit att det ar fruktansvart jobbigt att forsoka sy i isattningarna i armarna och aven att jobba med inprovningar runt midjan och ryggen om tyget ar kviltat. Den basta metoden jag funnit ar att prova och sy fodret, sedan bygga upp vadderingen utan somsmaner, och sedan sy pa utsidan varefter plagget kviltas ned fardigt. Nar man tittar pa bilder av detta plagg fran tiden ifraga gar vanligen kvilt linjerna concentriskt runt armen och kroppen, vilket for mig innebar att de ocksa sytts dit efter att plagget byggts upp.
/maggie
- my_mmy
- Inlägg: 422
- Blev medlem: 25 mars 2003, 07:41
- Ort: New Zealand
av Admin » 23 april 2003, 09:32
Hej!
Just den pourpoint som sägs ha tillhört Charles de Blois är lite ifrågasatt som rustningsplagg. MÅnga menar att den är ett plagg för gallerier och hov, med lite anstrykning av krigsflärden. Jag är böjd att hålla med. Det är ruskigt stor skillnad mellan de tyska vadderade jackorna (uppenbarligen tillverkade för krig) och de plagg som har använts av hovfolk.
/Henrik
Just den pourpoint som sägs ha tillhört Charles de Blois är lite ifrågasatt som rustningsplagg. MÅnga menar att den är ett plagg för gallerier och hov, med lite anstrykning av krigsflärden. Jag är böjd att hålla med. Det är ruskigt stor skillnad mellan de tyska vadderade jackorna (uppenbarligen tillverkade för krig) och de plagg som har använts av hovfolk.
/Henrik
- Admin
- Inlägg: 1272
- Blev medlem: 25 juli 2001, 00:00
- Ort: Sweden
av my_mmy » 23 april 2003, 10:35
<blockquote id="quote"><font size="1" face="Verdana, Arial, Helvetica" id="quote">quote:<hr height="1" noshade id="quote"><i>Originally posted by Admin</i>
Just den pourpoint som sägs ha tillhört Charles de Blois är lite ifrågasatt som rustningsplagg. MÅnga menar att den är ett plagg för gallerier och hov, med lite anstrykning av krigsflärden. Jag är böjd att hålla med. Det är ruskigt stor skillnad mellan de tyska vadderade jackorna (uppenbarligen tillverkade för krig) och de plagg som har använts av hovfolk.
<hr height="1" noshade id="quote"></blockquote id="quote"></font id="quote">
Hej Henrik,
jo, Charles' pourpoint ar ganska sakert inte avsett for att kriga i - den ar av dyrbart siden, fodrad med siden, ingen vaddering och ingen kvilting (numera ar den, men det ar en foljd av harda restaureringar). Den ar ganska uppenbart ett prakt plagg. Men stilen, grand assiette, tatt atsittande, ar ofta sedd i manuskript i en vadderad variant som "rustning". Jag ar mitt i en stor hog strykning just nu, men i Nockerts bok om Margrete klanningen finns atminstone ett exempel. Den stilen pa armar ar ocksa perfekt for strid - full rorlighet at alla hall utan drag i kladerna.
/maggie
Just den pourpoint som sägs ha tillhört Charles de Blois är lite ifrågasatt som rustningsplagg. MÅnga menar att den är ett plagg för gallerier och hov, med lite anstrykning av krigsflärden. Jag är böjd att hålla med. Det är ruskigt stor skillnad mellan de tyska vadderade jackorna (uppenbarligen tillverkade för krig) och de plagg som har använts av hovfolk.
<hr height="1" noshade id="quote"></blockquote id="quote"></font id="quote">
Hej Henrik,
jo, Charles' pourpoint ar ganska sakert inte avsett for att kriga i - den ar av dyrbart siden, fodrad med siden, ingen vaddering och ingen kvilting (numera ar den, men det ar en foljd av harda restaureringar). Den ar ganska uppenbart ett prakt plagg. Men stilen, grand assiette, tatt atsittande, ar ofta sedd i manuskript i en vadderad variant som "rustning". Jag ar mitt i en stor hog strykning just nu, men i Nockerts bok om Margrete klanningen finns atminstone ett exempel. Den stilen pa armar ar ocksa perfekt for strid - full rorlighet at alla hall utan drag i kladerna.
/maggie
- my_mmy
- Inlägg: 422
- Blev medlem: 25 mars 2003, 07:41
- Ort: New Zealand
av Joakim K » 23 april 2003, 10:50
<blockquote id="quote"><font size="1" face="Verdana, Arial, Helvetica" id="quote">quote:<hr height="1" noshade id="quote">For the work I also needed needles and thread, which I could find at the wholesale as well. I bought a small but rather thick needle with cutting edges for my purpose. The most conspicous item in the store was a 12 cm long monster needle with three cutting edges, I had to buy that one too (which I later was lucky for). The materials were all relatively unexpensive, all in all I payed about 50 – 70 Euro.<hr height="1" noshade id="quote"></blockquote id="quote"></font id="quote">
Var var det någonstans du fick tag i dem?
Utmärkt dokument för övrigt! Betydligt bättre än det mesta andra jag har sett hittills.... Är själv inne i "researchfasen"... Jag vill inte upptäcka att jag har gjort helt fel när jag har klippt ut X antal lager....
Var var det någonstans du fick tag i dem?
Utmärkt dokument för övrigt! Betydligt bättre än det mesta andra jag har sett hittills.... Är själv inne i "researchfasen"... Jag vill inte upptäcka att jag har gjort helt fel när jag har klippt ut X antal lager....
- Joakim K
- Inlägg: 562
- Blev medlem: 18 november 2002, 09:32
- Ort:
av Admin » 23 april 2003, 11:12
Maggie:
Jag tror att man kan sluta sig till att tallriksärmarna förvisso är lämpliga för rörelsefriheten, men av allt bildmaterial att döma förekommer det inte under perioden före eller efter vad gäller rustningsplagg. Däremot så förekommer tallriksärmarna flitigt inom både 1300-talets och 1400-talets mode. Slutsatsen kanske blir att man inte använder tallriksärmar på grund av praktiska skäl, utan av modeskäl. Annars skulle man kanske ha fortsatt med den typen av ärmar även senare?
Joakim:
Materialet är införskaffat på Stig Augustsson AB i Årsta industriområde (om jag inte minns fel).
/Henrik
Jag tror att man kan sluta sig till att tallriksärmarna förvisso är lämpliga för rörelsefriheten, men av allt bildmaterial att döma förekommer det inte under perioden före eller efter vad gäller rustningsplagg. Däremot så förekommer tallriksärmarna flitigt inom både 1300-talets och 1400-talets mode. Slutsatsen kanske blir att man inte använder tallriksärmar på grund av praktiska skäl, utan av modeskäl. Annars skulle man kanske ha fortsatt med den typen av ärmar även senare?
Joakim:
Materialet är införskaffat på Stig Augustsson AB i Årsta industriområde (om jag inte minns fel).
/Henrik
- Admin
- Inlägg: 1272
- Blev medlem: 25 juli 2001, 00:00
- Ort: Sweden
av my_mmy » 23 april 2003, 11:43
Henrik,
good point!
fore ar val i och for sig inte konstigt, men efterat... personligen har jag ingen aning om vad for vapenrockar/jacks etc man hade efter 1400-talet eller hur de sag ut. Foljde de civilt mode? for den delen ar det ju en intressant fraga om tallriksarmarna var ett civilt mode som kopierades for strid eller tvartom. gick de ur modet civilt och darefter militart, eller tvartom? Vad hande vapenmassigt efter den har tiden? andringar i rorelser, eller liknande? [?]
Durn it. Nu kan jag inte lata bli att grunna, och jag har inte tid att grava i det. dags att ga och lagga sig. [|)]
/maggie
good point!
fore ar val i och for sig inte konstigt, men efterat... personligen har jag ingen aning om vad for vapenrockar/jacks etc man hade efter 1400-talet eller hur de sag ut. Foljde de civilt mode? for den delen ar det ju en intressant fraga om tallriksarmarna var ett civilt mode som kopierades for strid eller tvartom. gick de ur modet civilt och darefter militart, eller tvartom? Vad hande vapenmassigt efter den har tiden? andringar i rorelser, eller liknande? [?]
Durn it. Nu kan jag inte lata bli att grunna, och jag har inte tid att grava i det. dags att ga och lagga sig. [|)]
/maggie
- my_mmy
- Inlägg: 422
- Blev medlem: 25 mars 2003, 07:41
- Ort: New Zealand
av Halvor » 23 april 2003, 16:51
Når det gjelder navn...
På norsk skiller vi mellom "våpentröye", en tynnere gambeson til å ha innerst, og "panzer",som er en tykkere ytterrustning uten ermer (omtrent som de tyske "gesteppter waffenrock") I tillegg er navn som "muza", "wambasium" og "vápnrokkr" kjent fra forskjellige kilder.
Halvor
På norsk skiller vi mellom "våpentröye", en tynnere gambeson til å ha innerst, og "panzer",som er en tykkere ytterrustning uten ermer (omtrent som de tyske "gesteppter waffenrock") I tillegg er navn som "muza", "wambasium" og "vápnrokkr" kjent fra forskjellige kilder.
Halvor
- Halvor
- Inlägg: 696
- Blev medlem: 5 december 2002, 10:42
- Ort: Norway
av Peter » 23 april 2003, 19:21
Agh!
Jag som redan börjat sy kilometervis av kanaler... Attans bananer!
Råbomull? Är det vad jag tror det är? Fluff i allmänhet?
Jag skulle också vara tacksam om någon kunde förtydliga det hela; OK att man kviltar materialet mellan två lager tyg (rätt så långt?), men hur inleder man? Lägger man helt enkelt ett toktjockt lager bomull på ett tygstycke, varefter man placerar ett annat dito ovanpå för att sedan glatt börja kvilta? Har jag förstått det hela rätt?
Hur mycket bomull skulle det gå åt, räknat i kilo?
Och förresten; vad gäller Maciejowskijbibelns illustrationer - har ni lagt märke till att de avbildade plaggen ser ut att ha sytts med rent enorma stygn (givetvis i förhållande till personen som bär plagget)?
Jag funderar lite över om det kan vara en grupp mindre stygn, ett mellanrum, ytterligare ett gäng stygn, mellanrum o.s.v.
Stora stygn borde vara mer utsatta för åverkan än mindre, om ni förstår vad jag menar.
Henrik; det verkade rätt segt att sy igenom all bomull. Jag funderade genast på att håla med syl. Kan det vara något?
Jag som redan börjat sy kilometervis av kanaler... Attans bananer!
Råbomull? Är det vad jag tror det är? Fluff i allmänhet?
Jag skulle också vara tacksam om någon kunde förtydliga det hela; OK att man kviltar materialet mellan två lager tyg (rätt så långt?), men hur inleder man? Lägger man helt enkelt ett toktjockt lager bomull på ett tygstycke, varefter man placerar ett annat dito ovanpå för att sedan glatt börja kvilta? Har jag förstått det hela rätt?
Hur mycket bomull skulle det gå åt, räknat i kilo?
Och förresten; vad gäller Maciejowskijbibelns illustrationer - har ni lagt märke till att de avbildade plaggen ser ut att ha sytts med rent enorma stygn (givetvis i förhållande till personen som bär plagget)?
Jag funderar lite över om det kan vara en grupp mindre stygn, ett mellanrum, ytterligare ett gäng stygn, mellanrum o.s.v.
Stora stygn borde vara mer utsatta för åverkan än mindre, om ni förstår vad jag menar.
Henrik; det verkade rätt segt att sy igenom all bomull. Jag funderade genast på att håla med syl. Kan det vara något?
- Peter
- Inlägg: 468
- Blev medlem: 22 april 2003, 12:27
- Ort: Sweden
av Admin » 23 april 2003, 23:02
Peter:
Problemen med att sy genom bomull beror inte på att det är jobbigt att få till hålet, utan att det är ett helvete att få igenom nålen. Om man sylar hålet i förväg kommer hålet att vara hjälplöst försvunnet när man tar fram nålen. Enda sättet är att pressa pressa pressa tills man kommer igenom allt material.
Ang. Kviltning:
Ja, man lägger all bomull mellan två eller fler grova tygstycken och försöker få fason på det hela. I början ser det ut att vara sjukt mycket bomull och man tror att man jobbar med en modell av Michelin. För att inte bomullen ska flytta på sig när man syr har man stor fördel av att dra några stygn genom alltihop innan för att se till att materialet ligger på rätt plats hela tiden.
/Henrik
Problemen med att sy genom bomull beror inte på att det är jobbigt att få till hålet, utan att det är ett helvete att få igenom nålen. Om man sylar hålet i förväg kommer hålet att vara hjälplöst försvunnet när man tar fram nålen. Enda sättet är att pressa pressa pressa tills man kommer igenom allt material.
Ang. Kviltning:
Ja, man lägger all bomull mellan två eller fler grova tygstycken och försöker få fason på det hela. I början ser det ut att vara sjukt mycket bomull och man tror att man jobbar med en modell av Michelin. För att inte bomullen ska flytta på sig när man syr har man stor fördel av att dra några stygn genom alltihop innan för att se till att materialet ligger på rätt plats hela tiden.
/Henrik
- Admin
- Inlägg: 1272
- Blev medlem: 25 juli 2001, 00:00
- Ort: Sweden
Vilka är online
Användare som besöker denna kategori: Inga registrerade användare och 3 gäster